X/Over Design & Construction
If you fancy making your own x/overs, then here are a few designs that can easily be put together.
For this you will need a piece of wood to mount the parts onto, a hot glue gun and some glue sticks, a soldering iron and solder, and finally some wire. Any piece of wood will work as a mounting board.
First, layout the components on the board according to the crossover diagram that you have made. Try to place the components close enough to each other so that jumper wires are not required to connect the different components together. Cut the board to size once you have decided on the layout.
Once the components are in place, use your hot glue gun to mount them to the board. Be sure that the inductor coils are not near each other and that each one is on a different axis to eliminate "inductive coupling" .
Now solder the different components together. If possible, solder the components directly to each other. Otherwise, use short jumper wires to connect them.
Finally, mount the crossover in your speaker, connect the crossover leads to the back of your binding post, and connect the speakers to the crossover. Positive (+) to Red. Negative (-) to Black.
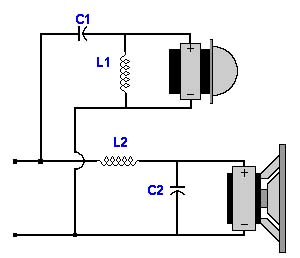
The 2 x/overs below are best suited for both 12” and 15” cabs that are going to be run full range.
2.5K 2 way X/over
8 Ohm Tweeter / 8 Ohm Woofer
Parts List
Capacitors
C1 = 5 uF
C2 = 5 uF
Inductors
L1 = 1 mH
L2 = 1 mH